Build A Discord Bot
Building Your First Discord Bot: A Comprehensive Guide to Discord.py
This guide provides a step-by-step walkthrough for creating a functional Discord bot using the popular Python library, discord.py. We will cover essential prerequisites, setting up your development environment, understanding Discord API concepts, writing core bot logic, implementing basic commands, and deploying your bot. This process involves several key stages, from initial setup to command implementation and eventual deployment, ensuring a robust foundation for any Discord bot project.
The first prerequisite is a fundamental understanding of Python programming. Familiarity with Python’s syntax, data structures (lists, dictionaries), control flow (if/else, loops), and basic object-oriented programming concepts will significantly ease the learning curve. Install Python 3.7 or a later version from the official Python website (python.org). During installation, ensure you check the box that says "Add Python to PATH," which simplifies executing Python scripts from your command line. While discord.py supports asynchronous programming extensively, a foundational grasp of what async and await keywords signify in Python will be beneficial, though the library abstracts away much of the complexity.
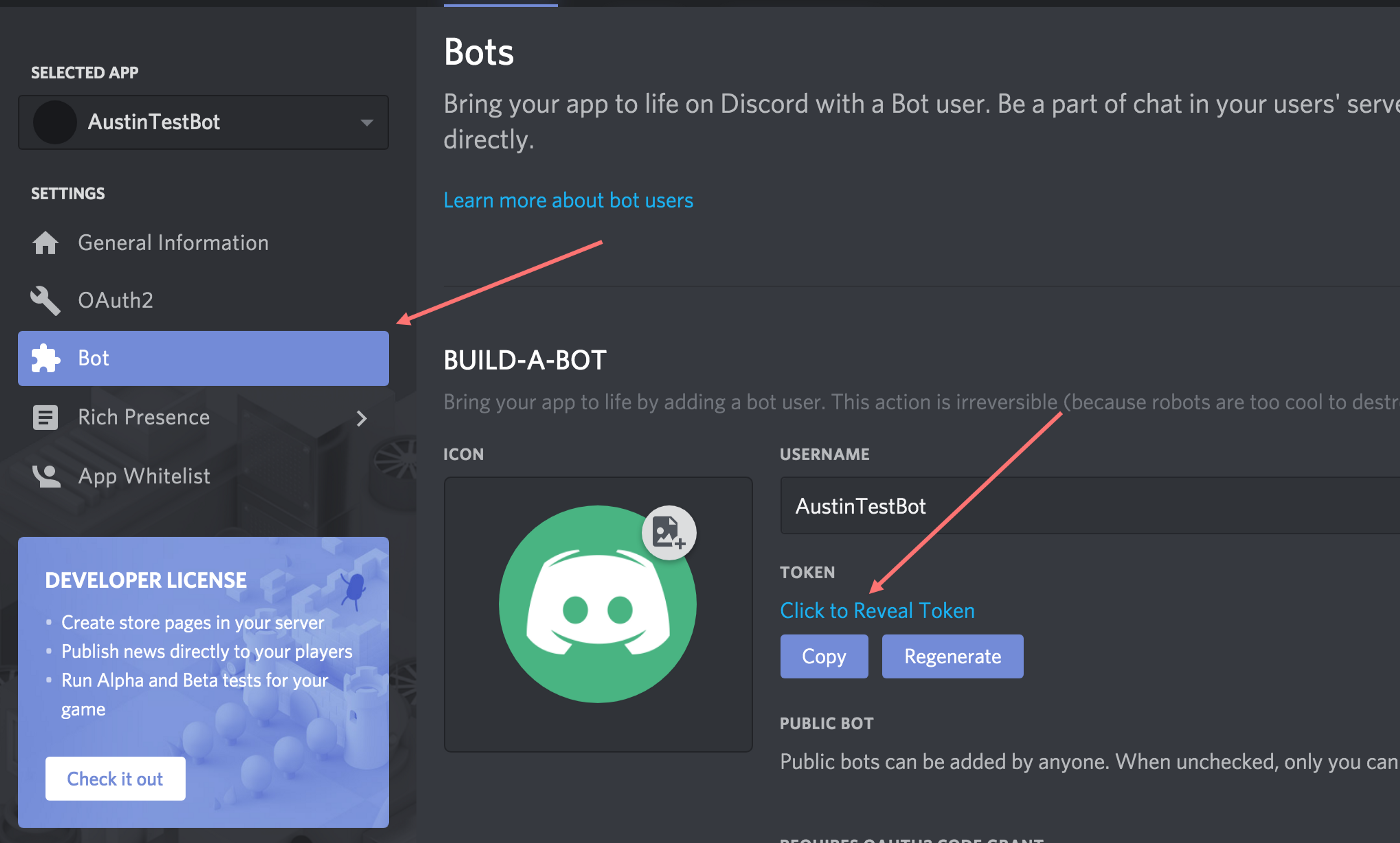
Next, you’ll need a Discord account and a server where you can test your bot. Create a new Discord server for development purposes to avoid interfering with existing communities. Within Discord, you’ll need to create an application and a bot user. Navigate to the Discord Developer Portal (discord.com/developers/applications), log in with your Discord account, and click "New Application." Give your application a descriptive name (e.g., "MyFirstBot"). Once the application is created, go to the "Bot" tab on the left-hand sidebar and click "Add Bot." Confirm the action, and you’ll see your bot’s username and a token. This token is highly sensitive; it’s your bot’s password and should never be shared publicly. Click "Copy" to save this token for later use.
To invite your bot to your server, you need to generate an OAuth2 URL. Go back to the "OAuth2" tab in the Developer Portal, then select "URL Generator." Under "SCOPES," select bot. Under "BOT PERMISSIONS," choose the necessary permissions for your bot to function. For a basic bot, Send Messages, Read Message History, and Embed Links are good starting points. Scroll down to the generated URL, copy it, and paste it into your web browser. Select the server you want to invite your bot to from the dropdown menu and authorize the invitation. Your bot should now appear offline in your server’s member list.
The core of your Discord bot will be written in Python using the discord.py library. Open your terminal or command prompt and install it using pip: pip install discord.py. For more advanced features like slash commands, you might also consider installing discord.py with the voice or speed extras, though these are not strictly necessary for this foundational guide. For instance, pip install discord.py[voice] would install support for voice channel operations.
Create a new Python file for your bot’s code, for example, bot.py. At the beginning of this file, you’ll need to import the discord library and instantiate a Client object. The Client object is the primary interface for interacting with the Discord API. You’ll also need to specify intents, which are events your bot wishes to receive from Discord. Intents are crucial for privacy and efficiency; you only receive data your bot is configured to process.
import discord

# Define intents - a set of events your bot will receive
intents = discord.Intents.default()
intents.message_content = True  # Required to read message content

# Create a client instance
client = discord.Client(intents=intents)
The intents.message_content = True line is particularly important for bots that need to read the content of messages to respond to commands. Without this intent, your bot won’t be able to see what users are typing in chat.
Now, you need to define event handlers. These are functions that discord.py calls when specific events occur on Discord. The most fundamental event is on_ready, which fires when your bot successfully connects to Discord.
@client.event
async def on_ready():
    print(f'Logged in as {client.user.name}!')
    print(f'Bot ID: {client.user.id}')
    print('------')
The @client.event decorator registers the on_ready function as an event handler. The async keyword indicates that this is an asynchronous function, which is standard practice in discord.py due to the asynchronous nature of network communication. Inside on_ready, we print some basic information about the connected bot, confirming its identity.
The next crucial event handler is on_message. This function is triggered every time a message is sent in a channel your bot has access to. Here, you’ll implement your bot’s command processing logic.
@client.event
async def on_message(message):
    # Ignore messages from the bot itself to prevent infinite loops
    if message.author == client.user:
        return

    # Simple command to reply with "Pong!"
    if message.content.startswith('$hello'):
        await message.channel.send('Pong!')
The if message.author == client.user: check is vital. Without it, your bot would read its own messages, potentially triggering a loop where it responds to itself indefinitely. The message.content.startswith('$hello') condition checks if the message begins with the prefix $hello. If it does, the bot sends "Pong!" back to the same channel using await message.channel.send('Pong!').
To run your bot, you need to use the token you copied from the Discord Developer Portal. Add the following line at the end of your bot.py file, replacing "YOUR_BOT_TOKEN" with your actual token. It’s highly recommended to store your token in an environment variable or a separate configuration file for security reasons, rather than hardcoding it directly in the script, especially for public repositories.
client.run('YOUR_BOT_TOKEN')To execute your bot, open your terminal, navigate to the directory where you saved bot.py, and run the command: python bot.py. If everything is set up correctly, you should see the "Logged in as…" message in your terminal, and your bot will appear online in your Discord server. You can then type $hello in a text channel, and your bot should respond with "Pong!".
For more complex bots, managing commands directly within on_message can become cumbersome. discord.py provides a powerful commands extension for a more structured approach to command creation. To use this, you’ll need to install it separately if you didn’t already: pip install discord.py[voice] (this often includes the commands extension) or pip install discord.ext.commands.
Modify your bot.py to use commands.Bot instead of discord.Client. You’ll also need to define a command prefix.
import discord
from discord.ext import commands

# Define intents
intents = discord.Intents.default()
intents.message_content = True

# Create a bot instance with a command prefix
bot = commands.Bot(command_prefix='!', intents=intents)

@bot.event
async def on_ready():
    print(f'Logged in as {bot.user.name}!')
    print(f'Bot ID: {bot.user.id}')
    print('------')

@bot.command()
async def ping(ctx):
    """Responds with Pong!"""
    await ctx.send('Pong!')
In this example, commands.Bot is initialized with command_prefix='!'. This means all commands will need to start with an exclamation mark. The ping function is now a command. The @bot.command() decorator automatically registers it. The ctx (context) object passed to the command function contains information about the message, channel, author, and more. ctx.send() is equivalent to message.channel.send() but is provided by the commands extension.
To run this bot, replace client.run() with bot.run('YOUR_BOT_TOKEN'). Now, typing !ping in your Discord server will trigger the ping command and the bot will respond with "Pong!".
Adding more commands is straightforward. Let’s create a command that takes arguments.
@bot.command()
async def echo(ctx, *, message_to_say: str):
    """Repeats the message provided by the user."""
    await ctx.send(message_to_say)
The *, message_to_say: str part indicates that the command expects one or more arguments, and all subsequent text after the command name will be captured into the message_to_say variable, which is type-hinted as a string. If a user types !echo Hello World, the bot will send "Hello World".
Error handling is crucial for a robust bot. The commands extension provides mechanisms for handling errors that occur during command execution. You can define an error handler function that gets called when a command raises an exception.
@bot.event
async def on_command_error(ctx, error):
    if isinstance(error, commands.MissingRequiredArgument):
        await ctx.send("You are missing a required argument for this command.")
    elif isinstance(error, commands.CommandNotFound):
        await ctx.send("That command does not exist.")
    else:
        print(f"An unexpected error occurred: {error}")
        await ctx.send("An unexpected error occurred. Please try again later.")
This on_command_error function checks for specific error types like commands.MissingRequiredArgument (if a user forgets to provide an argument) or commands.CommandNotFound. For any other errors, it logs them to the console and informs the user.
For larger bots, organizing your code into multiple files and using "cogs" is highly recommended. Cogs are classes that group related commands and event listeners. This modularity improves maintainability and scalability.
Create a new directory named cogs in your project folder. Inside this directory, create a Python file for your cog, e.g., general.py.
import discord
from discord.ext import commands

class General(commands.Cog):
    def __init__(self, bot):
        self.bot = bot

    @commands.command()
    async def hello(self, ctx):
        """Greets the user."""
        await ctx.send(f'Hello {ctx.author.mention}!')

async def setup(bot):
    await bot.add_cog(General(bot))
In general.py, we define a General class that inherits from commands.Cog. The __init__ method takes the bot instance. The hello command is now a method within this class. The setup asynchronous function is required for discord.py to load the cog.
Now, in your main bot.py file, you need to load this cog.
import discord
from discord.ext import commands
import os # For environment variables

# Define intents
intents = discord.Intents.default()
intents.message_content = True

# Create a bot instance
bot = commands.Bot(command_prefix='!', intents=intents)

@bot.event
async def on_ready():
    print(f'Logged in as {bot.user.name}!')
    print(f'Bot ID: {bot.user.id}')
    print('------')
    # Load cogs
    await bot.load_extension('cogs.general') # Load the general cog
    print('Cogs loaded successfully.')

# Command to manually load a cog (optional, but useful for development)
@bot.command()
@commands.is_owner() # Restrict to bot owner
async def load(ctx, extension):
    await bot.load_extension(f'cogs.{extension}')
    await ctx.send(f'Loaded {extension}.')

# Command to manually unload a cog (optional)
@bot.command()
@commands.is_owner()
async def unload(ctx, extension):
    await bot.unload_extension(f'cogs.{extension}')
    await ctx.send(f'Unloaded {extension}.')

# Command to manually reload a cog (optional)
@bot.command()
@commands.is_owner()
async def reload(ctx, extension):
    await bot.reload_extension(f'cogs.{extension}')
    await ctx.send(f'Reloaded {extension}.')

# Get bot token from environment variable for security
BOT_TOKEN = os.environ.get('DISCORD_BOT_TOKEN')

if BOT_TOKEN is None:
    print("Error: DISCORD_BOT_TOKEN environment variable not set.")
else:
    bot.run(BOT_TOKEN)
In bot.py, we use bot.load_extension('cogs.general') within on_ready to load the cog. The os module is used to fetch the bot token from an environment variable named DISCORD_BOT_TOKEN. You’ll need to set this environment variable on your system before running the bot. Commands like load, unload, and reload are added for dynamic cog management, restricted to the bot owner using @commands.is_owner().
To deploy your bot and keep it running continuously, you have several options. For small personal projects or testing, you can run it on your own computer. However, for a bot that needs to be online 24/7, you’ll need to use a hosting service. Popular choices include:
- Heroku: A cloud platform that offers a free tier suitable for small bots.
- PythonAnywhere: Another platform with a free tier, easy to use for beginners.
- VPS (Virtual Private Server): Services like DigitalOcean, Linode, or AWS EC2 provide more control but require more technical setup. You’d typically run your bot within a
screenortmuxsession on the VPS. - Dedicated Bot Hosting Services: Some services are specifically designed for hosting Discord bots.
When deploying, ensure you correctly set up your environment variables (especially your bot token) on the hosting platform. For example, on Heroku, you would set the DISCORD_BOT_TOKEN variable in the application’s settings. You’ll also need a requirements.txt file that lists all your Python dependencies. Create it using pip freeze > requirements.txt.
This comprehensive guide covers the fundamental steps to build and deploy a Discord bot using discord.py. From setting up your environment and understanding Discord’s API to implementing commands, handling errors, and structuring your code with cogs, you now have the knowledge to create a variety of functional Discord bots. Remember to consult the official discord.py documentation for more advanced features and detailed explanations of specific functions and classes. The Python ecosystem for Discord bots is rich and constantly evolving, providing endless possibilities for customization and expansion.


