How to check process start time in windows? Understanding when processes launch in Windows is crucial for troubleshooting and performance analysis. This guide dives deep into various methods, from command-line tools to the Event Viewer, enabling you to pinpoint the exact moment a program begins its execution. We’ll explore the significance of these timestamps, different time units, and ultimately, how to interpret the results to identify potential issues.
We’ll cover essential tools like Tasklist and WMIC, and demonstrate how to extract start times with detailed examples. We’ll also delve into the Event Viewer, explaining how it logs process startup events. Finally, we’ll discuss troubleshooting scenarios and best practices for monitoring process start times regularly.
Introduction to Process Start Times in Windows
Process start times in Windows represent the moment a process begins execution. Understanding these times is crucial for diagnosing performance issues and identifying potential bottlenecks. Knowing when a process starts helps pinpoint the origin of delays, enabling proactive adjustments to improve overall system responsiveness. This information is valuable in troubleshooting situations where applications or system components are unexpectedly slow or unresponsive.Knowing the precise time a process launches provides valuable insights into system behavior.
For example, if a particular process consistently starts significantly later than expected, it could indicate resource contention, faulty drivers, or a configuration problem. By examining the timing of process initiation, we can pinpoint potential areas of concern and take steps to optimize system performance. This is particularly useful for identifying and addressing long-running processes that might be consuming excessive system resources.
Process Start Time Units, How to check process start time in windows
Process start times are measured using standard time units, primarily milliseconds (ms) and seconds (s). Milliseconds represent a thousandth of a second, offering a high level of precision for detailed timing analysis. Seconds provide a more general measure of the elapsed time, useful for broad performance assessments. The choice of unit depends on the specific context of the analysis, whether detailed timing information or a general overview is required.
Significance of Process Start Times
Accurate process start times are critical for performance analysis and troubleshooting. They allow for the identification of delays or anomalies in process execution, facilitating the resolution of performance issues. For example, if a process is consistently taking longer to start than usual, it could be due to factors like a network latency spike, a slow hard drive, or a faulty system driver.
This allows IT professionals to isolate the source of the problem and take appropriate corrective actions.
Example Data Table
Understanding process start times is essential for monitoring and troubleshooting system performance. The table below illustrates a sample of process start times, providing a clear view of when processes began and how long they lasted. This data would be collected by a system monitoring tool and provides a useful reference for evaluating process execution time.
| Process Name | Start Time (UTC) | Duration (seconds) |
|---|---|---|
| System Idle Process | 2024-08-28 10:00:00 | 3600 |
| explorer.exe | 2024-08-28 10:00:05 | 3500 |
| chrome.exe | 2024-08-28 10:00:10 | 1800 |
| discord.exe | 2024-08-28 10:00:15 | 1200 |
Methods for Checking Process Start Times
Understanding when a process starts is crucial for troubleshooting performance issues, analyzing system load, and ensuring application reliability. Knowing the precise timing of process initialization can help pinpoint bottlenecks and optimize resource allocation. This section details various methods for acquiring process start times in Windows, ranging from command-line tools to the Event Viewer.Various methods exist for determining process start times, each with its own strengths and weaknesses regarding accuracy and usability.
The choice of method depends on the specific needs of the analysis, considering the level of detail required and the tools available.
Command-Line Tools (Tasklist, wmic)
Command-line tools like `tasklist` and `wmic` provide a quick way to obtain process information, including the start time. These tools are readily available in most Windows installations and are often sufficient for basic process monitoring. They provide a straightforward method for gathering information on running processes.
- `tasklist`: This utility displays a list of running processes, including their start times. The `tasklist` command can be used with options to format the output and include specific details about processes. For instance, using `tasklist /fi “imagename eq notepad.exe”` will show only the Notepad processes, making the results more focused.
- `wmic`: The Windows Management Instrumentation Command-line tool offers more comprehensive process information. `wmic` can be used to query process properties, including the start time, through specific commands. For example, `wmic process get name,creationdate` will list the process name and creation date. This offers more control over the data retrieved compared to `tasklist`.
Event Viewer
The Event Viewer is a powerful tool for tracking system events, including process startup events. It provides detailed logs of system activities, allowing for in-depth analysis of process initialization. Event Viewer offers granular insights into the process creation process.
- Detailed Logging: Event Viewer logs every event, providing a comprehensive record of system activity. This detailed information can be invaluable for diagnosing complex issues or tracing the sequence of events that led to a particular process starting.
- Filtering Capabilities: The Event Viewer allows for filtering events based on various criteria, including process name, date, and time. This capability enables users to narrow down the results to specific processes or time periods, significantly improving the efficiency of analysis.
- Event Correlation: By analyzing events in the context of other events, you can gain valuable insight into how processes interact and the circumstances surrounding their creation. This is helpful for determining if a process start is triggered by another event or a particular condition.
Comparison of Methods
| Feature | `tasklist` | `wmic` | Event Viewer |
|---|---|---|---|
| Ease of Use | High | Medium | Low |
| Time Granularity | Low (seconds) | Medium (seconds) | High (milliseconds) |
| Output Format | Simple text | Flexible text/table | Detailed XML |
| Accuracy | High for basic info | High for specific data | Highest for context and correlation |
| Usability for Analysis | Good for quick checks | Good for specific queries | Excellent for detailed investigations |
The table above summarizes the key differences in ease of use, time granularity, output format, and accuracy of the various methods. Choose the method best suited to the specific analysis task.
Line Tools for Start Time Retrieval
Tasklist is a powerful command-line tool in Windows that provides a wealth of information about running processes. Beyond basic process listing, Tasklist offers parameters to extract crucial details, including start times. This makes it a valuable resource for troubleshooting, performance analysis, and understanding process lifecycles. This section delves into using Tasklist to specifically retrieve process start times.Using Tasklist for process information retrieval is efficient and readily available.
This approach eliminates the need for complex scripting or third-party tools, relying on built-in Windows functionality.
Using Tasklist to Display Process Information
Tasklist, by default, displays a list of running processes, including the process ID (PID), image name (executable name), username, and more. Without specific parameters, it provides a general overview. The crucial step involves utilizing the appropriate parameters to isolate the start time.
Tasklist Syntax and Parameters for Start Time Extraction
Tasklist’s flexibility comes from its various parameters. These parameters allow users to tailor the output to their specific needs. To extract start times, one must know the correct syntax and utilize the right options. Understanding the options for filtering and sorting is critical.
| Parameter | Description | Example Usage |
|---|---|---|
| /FI | Filters the output based on specified criteria. | `/FI “IMAGENAME eq notepad.exe”` (filters for notepad.exe) |
| /FO | Specifies the output format. | `/FO CSV` (comma-separated values) |
| /v | Displays verbose information, including start times. | Use with /FO CSV |
| /svc | Displays service information, if applicable. | `/svc` |
The table above presents a concise overview of commonly used Tasklist parameters. Each parameter plays a distinct role in refining the output. Understanding their purpose is essential for accurate and targeted data extraction.
Detailed Examples of Tasklist Usage
To illustrate, let’s consider several examples of how to use Tasklist to extract start times. These examples demonstrate the practical application of the parameters and showcase how to isolate the desired information.
- To display the start time of all running processes in a CSV format, use the command:
tasklist /v /fo CSV - To display the start time of notepad.exe:
tasklist /FI "IMAGENAME eq notepad.exe" /v /fo CSV - To display the start time of a process with a specific PID:
tasklist /FI "PID eq 1234" /v /fo CSV
Example: Displaying Process Names and Start Times
This example demonstrates a complete Tasklist command that displays process names and start times in a user-friendly format.
tasklist /v /fo LIST
This command uses the /v switch to get verbose output, including start times, and /fo LIST to format the output as a simple list. The output will clearly show the process name and its start time.
Using WMIC for Process Start Time Extraction
WMIC, or Windows Management Instrumentation Command-line, is a powerful tool for querying and managing various aspects of Windows systems. It offers a flexible way to retrieve system information, including process details, and is particularly useful for automating tasks or gathering data programmatically. This section focuses on leveraging WMIC to extract crucial process start times, demonstrating its efficiency and versatility.WMIC provides a straightforward approach to querying process information.
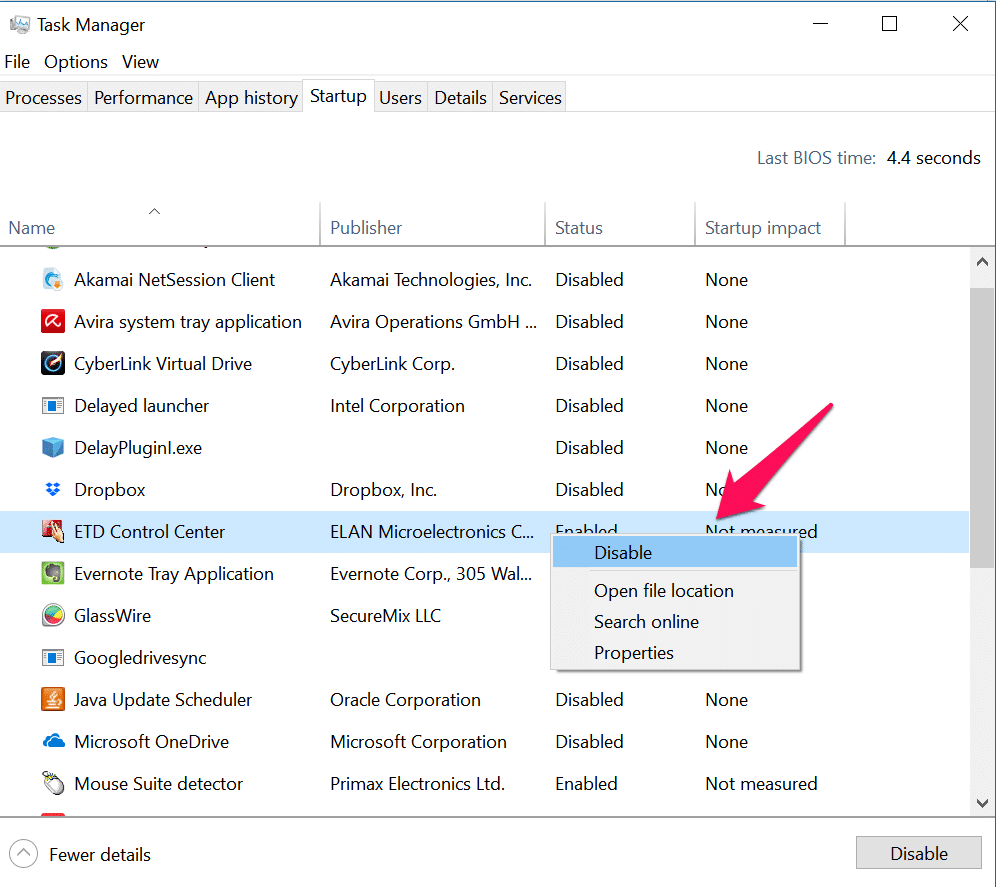
Figuring out when a process started in Windows can be tricky, but it’s surprisingly easy to find out. You can use Task Manager to see the startup time of various programs, which is useful for troubleshooting. Speaking of troubleshooting, did you catch the San Ramon Valley Lincoln Stockton NorCal D1 Final Boys Basketball Tuesday? san ramon valley lincoln stockton norcal d1 final boys basketball tuesday was a nail-biter, and I bet there were a lot of processes running in the background! Once you know how to use Task Manager effectively, you can quickly see when any process started.
Its command syntax, though sometimes less intuitive than graphical tools, allows for precise control over the data retrieved. By understanding the specific WMIC commands and their parameters, you can extract process start times quickly and accurately, providing valuable insights into system performance and resource usage.
WMIC Command Syntax for Start Time Retrieval
The core command for retrieving process start times using WMIC is `wmic`. To get process start times, you need to specify the `process` class and filter for the required information.
Example WMIC Queries for Process Start Times
To illustrate, consider these examples:
- Retrieving the start time of a specific process named “explorer.exe”:
wmic process where name="explorer.exe" get creationdate
This command targets the “explorer.exe” process and retrieves its creation date, which represents the start time. The output will be in a format understandable by Windows.
- Retrieving start times for all running processes:
wmic process get name,creationdate
This retrieves the name and creation date for every running process, offering a comprehensive view of active processes and their corresponding start times.
- Retrieving start times for processes with a specific name pattern:
wmic process where name like "notepad%" get creationdate
This example retrieves the creation date of processes whose names start with “notepad”. This demonstrates the use of the `like` operator for filtering processes based on partial names, a useful technique for retrieving related process information.
WMIC Output Fields and Start Times
The output from the WMIC `process` query contains various fields, some of which are directly relevant to process start times. The most crucial field is `CreationDate`, which represents the precise moment the process was initiated.
| Field | Description | Relevance to Start Time |
|---|---|---|
| CreationDate | The date and time the process was created. | Directly provides the process start time. |
| Name | The name of the process. | Useful for identifying the process in question. |
| ProcessId | Unique identifier of the process. | Crucial for linking process information with other system data. |
Filtering WMIC Output for Specific Information
WMIC output can be tailored to include only the necessary information. This can significantly reduce the size of the output and improve the efficiency of data extraction. For instance, if you are interested only in the start time of a particular process, you can specify the `creationdate` field in your WMIC query, thus ensuring that only the relevant information is presented.
The query then focuses on the `creationdate` attribute to avoid extraneous data.
Event Viewer for Process Start Event Tracking
The Windows Event Viewer is a powerful tool for monitoring and troubleshooting system events. It acts as a comprehensive log, recording various activities, including process creation and termination. This makes it an invaluable resource for identifying when processes start and potential issues related to their initialization. Understanding how to leverage the Event Viewer for process startup event tracking is crucial for system administrators and developers alike.
The Event Viewer provides a detailed history of events, offering insights into the system’s behavior. This includes events related to specific processes, enabling the identification of problems or patterns in process startup. By examining these events, you can diagnose issues, analyze performance, and troubleshoot problems effectively.
Finding Process Startup Events in the Event Viewer
The Event Viewer is organized into different categories, each corresponding to a specific area of the system. To find process startup events, navigate to the Applications and Services Logs category. Within this category, you’ll find logs for specific applications and services. By examining these logs, you can discover information about process creation, including the exact time, user account, and associated application.
Figuring out when a process started in Windows can be tricky, but thankfully, there are ways to do it. While you’re looking for those answers, you might also want to check out some high-luck St. Paddy’s Day celebrations with cannabis! High luck St. Paddy’s lit ways to celebrate with cannabis are a great way to get in the festive spirit.
Once you’ve found the right resources, you can easily locate the start time of any process running on your system.
Identifying and Interpreting Process Startup Events
Examining process startup events within the Event Viewer involves understanding the event details. Event IDs are crucial identifiers; they correlate with specific event types. A particular event ID, along with the accompanying data, indicates the details of the process creation, including the process name, path, and user. For instance, an event ID related to a successful process startup will provide information about the user who launched it, the application involved, and the exact timestamp.
Common Event IDs Related to Process Creation
- This section details common Event IDs related to process creation and their corresponding descriptions. Knowing these IDs helps in quickly identifying process startup events and understanding their significance.
| Event ID | Description |
|---|---|
| 1000 | Process Creation (Generic). |
| 1001 | Process Creation (Specific to a program). |
| 1002 | Process Creation (Initiated by a service). |
| 1003 | Process Creation (Initiated by another process). |
| 1004 | Process Creation (Error during creation). |
Filtering and Sorting Events in the Event Viewer
The Event Viewer allows filtering and sorting events to locate specific process startup events. Filtering helps narrow down the results by specifying criteria like date, time, source, event ID, and user. Sorting allows arranging the events chronologically or alphabetically. For instance, you can filter by date range to locate process startups within a specific timeframe, or sort by user to identify which user initiated the creation of particular processes.
Interpreting and Analyzing Process Start Times

Process start times, while seemingly simple data points, offer valuable insights into system performance and potential issues. Understanding the context surrounding these times, along with the factors influencing them, is crucial for effective troubleshooting. Analyzing these times can reveal performance bottlenecks and identify processes that might be causing problems.
Interpreting process start times is not simply about noting the timestamps; it’s about understanding the
-why* behind those timestamps. System load, resource availability, and even other running processes all contribute to how quickly a program launches. By understanding these influencing factors, we can better pinpoint the root causes of performance issues.
Contextual Analysis of Start Times
Process start times are inherently contextual. A process taking 10 seconds to launch during a low-load period might be perfectly normal. However, the same process taking 10 seconds during a high-load period might indicate a problem. Understanding the overall system state when a process starts is vital for accurate interpretation.
Impact of System Load
System load, measured by CPU utilization, disk I/O, and network traffic, directly affects process launch times. High system load creates a bottleneck, delaying the allocation of resources needed for process initiation. This can cause processes to take significantly longer to start than usual. A sudden spike in process start times during a period of high system load is often a strong indicator of a performance issue.
Figuring out when a process started in Windows can be tricky, but there are ways to do it. You might be interested in the political climate surrounding the World Health Organization, especially during the Trump administration. For instance, the trump world health organization relationship saw some significant shifts in policy. Ultimately, finding the start time of a process involves using Task Manager or a command prompt command.
This gives you a detailed look into your system’s activity.
For instance, if a particular application consistently takes 5 seconds longer to start when the CPU is above 80%, it’s likely this application is resource-intensive and could be the source of performance degradation.
Impact of Other Factors
Beyond system load, various factors influence process start times. These include:
- Network connectivity: Processes requiring network access, such as downloading updates or communicating with remote servers, will experience delays if network conditions are poor.
- Disk I/O: Processes that rely heavily on disk access (like large file operations or database queries) will be slower to start if the disk is busy.
- Resource contention: Multiple processes competing for the same resources (memory, CPU, or network bandwidth) can lead to delays in the initiation of each.
- Driver issues: Outdated or malfunctioning device drivers can introduce delays and instability in processes that rely on those devices.
Understanding how these external factors interact with the process in question is crucial for interpreting start times accurately.
Diagnosing Performance Problems Using Start Times
Analyzing process start times can help identify performance problems. A sudden increase in start times for a particular process could suggest:
- Resource contention within the system.
- Issues with the process itself, such as inefficient code or dependencies.
- Hardware problems, including overloaded disks or faulty components.
By correlating process start times with other system metrics, such as CPU utilization and disk I/O, we can pinpoint the source of the performance problem. For instance, if a specific process consistently takes an unusually long time to start and the CPU utilization is also high during those periods, it suggests resource contention.
Correlating Process Start Times with Other System Events
Correlating process start times with other system events (such as log entries, user actions, or system configurations) provides a more complete picture of the system’s behavior. For example, if a particular process consistently starts after a specific user logs in, it might be related to user-initiated actions or configurations. This can help in understanding if the delay is related to a specific action or event, providing more context for the analysis.
Troubleshooting Scenarios: How To Check Process Start Time In Windows
Pinpointing the cause of slow process startup times can be tricky. Often, it’s not immediately obvious whether the issue lies with the application itself, the operating system’s performance, or even external factors like network congestion. A systematic approach to troubleshooting is crucial for identifying and resolving these problems effectively.
Common Causes of Slow Process Startup Times
Slow process startup times can stem from various factors, including hardware limitations, software conflicts, or even network connectivity problems. Common culprits include:
- Slow Disk Access: Hard drive performance plays a significant role in process startup times. If the hard drive is fragmented, experiencing high disk activity, or simply aging, it can lead to delays in loading application files and libraries.
- Network Issues: Applications requiring network resources for initial setup, like downloading updates or connecting to servers, can experience delays due to network congestion or poor connectivity. This is particularly noticeable in applications with remote dependencies.
- Insufficient System Resources: If the system’s memory (RAM) or processing power is overwhelmed by other running processes, it can lead to delays in loading new applications. Similarly, inadequate CPU cores can result in slow startup times.
- Application Bugs: A poorly optimized application or one with bugs in its startup sequence can lead to extended loading times.
- Operating System Issues: Corrupted system files, outdated drivers, or conflicts between installed software and the operating system can negatively affect startup times.
Troubleshooting Steps
A structured approach to troubleshooting slow process startup times is essential. The following steps can help pinpoint the source of the issue.
- Identify the Suspect Process: Determine which specific process is experiencing slow startup times. Using the methods previously discussed (e.g., `WMIC`) helps identify the problematic application.
- Check Disk Performance: Use built-in Windows tools or third-party utilities to assess hard drive health, fragmentation, and read/write speeds. High fragmentation levels and slow read/write speeds are indicative of disk performance problems. A fragmented hard drive can significantly impact application loading.
- Monitor Network Connectivity: Assess network bandwidth and latency. If the process relies on network access, slow network speeds will manifest as delays in loading. Tools like network monitoring utilities can help diagnose potential network bottlenecks.
- Examine System Resources: Monitor CPU and memory usage during process startup. High utilization levels indicate a resource constraint, potentially causing delays. Observe if other processes are heavily consuming system resources.
- Update Drivers and Software: Ensure all drivers and software components are up-to-date. Outdated drivers can sometimes cause compatibility issues, leading to performance problems. This is particularly important for network drivers and device drivers.
- Run a System File Checker Scan: If you suspect a corrupted system file, initiate a System File Checker scan to identify and repair corrupted or missing system files. This step can often resolve issues stemming from operating system corruption.
- Check Application Log Files: Examine the application’s logs for any error messages or warnings related to startup. Errors in the startup sequence are often recorded in these logs.
- Reinstall the Application: If all other troubleshooting steps fail, reinstalling the application can resolve conflicts or corrupted installation files, especially if the startup time issues are recurring.
Determining the Source of the Issue
To isolate the problem, consider whether the startup time issue affects all processes or only a specific application. If the issue is widespread, it’s likely a problem with the operating system itself. If only one application is affected, the issue may be related to that application’s code.
Best Practices for Start Time Monitoring
Regularly monitoring process start times is crucial for identifying performance bottlenecks, troubleshooting issues, and ensuring optimal system operation. This involves more than just checking the initial start time; it requires a proactive approach to scheduling, alerting, logging, and analyzing the data gathered. By implementing robust monitoring practices, you can gain valuable insights into system behavior and proactively address potential problems.
Establishing a Regular Monitoring Schedule
Consistent monitoring ensures you capture a comprehensive dataset for analysis. A well-defined schedule helps avoid missed events and allows for timely intervention. Consider factors like the frequency of process execution, expected variations in start times, and the desired level of detail. A daily snapshot of start times for critical processes might suffice, while more frequent monitoring might be necessary for high-throughput applications or those with unpredictable behavior.
Setting Up Alerts for Unusual Start Times
Setting alerts is vital for proactively addressing performance issues. Identify thresholds for acceptable start times based on historical data and expected variations. For example, if a process typically starts within 2 seconds, an alert could be triggered if it takes longer than 5 seconds consistently. Configure alerts to notify the appropriate personnel when unusual start times occur, enabling quick responses to potential problems.
Logging and Storing Start Time Data for Trend Analysis
Comprehensive logging of start time data is essential for trend analysis. Store the start time alongside other relevant information, such as process ID, user, and resource utilization. This structured data allows for deeper analysis and pattern recognition over time. For instance, you can observe if certain processes are consistently starting late during peak hours, potentially indicating resource constraints.
Creating a Monitoring Script for Process Start Times
A structured approach to creating a monitoring script is beneficial for automating the process. The script should collect process start times, log them to a database or file, and potentially send alerts based on defined criteria. Here’s a suggested structure:
- Initialization: The script begins by establishing connections to necessary databases or files, setting up alert channels, and defining thresholds for acceptable start times.
- Data Collection: The script uses appropriate Windows Management Instrumentation (WMIC) or other tools to retrieve process start times. It should collect the process ID, start time, and other relevant data points.
- Data Logging: The gathered data is logged to a designated storage location, ensuring the integrity of the historical record. This could be a database, a CSV file, or a dedicated log file.
- Alert Triggering: The script checks the collected start times against the defined thresholds. If a process starts outside the acceptable range, an alert is triggered via email, SMS, or other appropriate channels.
- Cleanup and Reporting: The script performs any necessary cleanup actions, such as closing connections, and generates reports summarizing the collected data. This reporting function can provide insights into overall system performance.
This structured approach ensures the script is robust, maintainable, and allows for easy scaling and adaptation to changing requirements.
Closing Summary
In conclusion, mastering the art of checking process start times in Windows empowers you to diagnose performance bottlenecks and resolve issues efficiently. Whether you’re a seasoned administrator or a curious user, this comprehensive guide provides a step-by-step approach to understanding the timing of your system processes. Armed with this knowledge, you’ll be well-equipped to tackle various troubleshooting scenarios and gain a deeper insight into your system’s inner workings.